Smiling teens!
Baseball was my first love. I could find a game anywhere. Sometimes it was just catch for two, find a third and you’ve got a game of pickle, add a fourth and you can shag pop flies, one more and it’s time for batting practice. Rainy days were spent reading the box scores and memorizing my heroes’ stats from the back of their trading cards. My mother would tell you that my love for reading was found in section 796 of the library — that’s where the baseball biographies dwell.

Zach's Storytelling.
I grew up in the East Bay and in the 70’s we had The Amazing A’s with Reggie, Rudi and Rollie leading the charge to three World Series titles. I did not realize what a truly amazing feat I was witnessing at the time. I’ve since witnessed many more great accomplishments and met several stars of the diamond but my most thrilling moment was meeting Hank Aaron. It was 1974 and he had just broken Babe Ruth’s home run record. The whole world was talking about him and I could tell you the number of hr’s and rbi’s he’d hit the last several years. He was on an appearance tour for Magnavox TV and my Dad handled the Magnavox account for the Oakland Tribune.

Father and son at the game.
Not usually a glamorous job but this week he was tasked with picking up Hammerin’ Hank at the airport and ushering him around the Bay Area for the day. Hank’s wife’s birthday was coming up so he needed to pick up a gift in the mall. Store policy did not allow the cashier to accept an out of state check (she was not aware that she was standing before baseball royalty), so my father wrote out a check for Hank’s $114 Seiko watch. Hank wrote him one in return, which my father never cashed. I’ve now got that check safely tucked away with other childhood memories. I was a wide eyed and speechless 6 year old taking it all in.
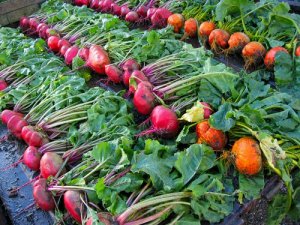
Kelly and I have four teens between us and are always trying to find interesting activities to coax them out. We’ll do anything, we even played guitar hero for an evening to get them over. My Mom’s birthday was last week and I decided it was time to take everyone to an A’s game. We not only got the four of them but they brought friends. My Mom was thrilled with the turnout; we had enough to make our own team (nine of us) to celebrate her birthday. The game did not start ‘til 7p.m. but Kelly and I started in the kitchen at 7a.m. for our pre-game feast. We made a tangy potato salad with a French dressing, a savory beet salad, Kelly’s Baked Fried Chicken (recipe below) and a beautiful sponge cake (recipe below) with raspberry icing (raspberries from Tolay Farms) drizzled artfully over the top. We made agauas frescas with watermelon to wash it down.

Our own gang of nine.
The A’s won a thriller, my Mom had a great evening, the kids ate, drank and were generally merry. We were then treated to a spectacular fireworks show. All in all the evening was a tremendous hit!
Kelly’s Baked-Fried Chicken
My kids loved this when they were little. It is a favorite of mine too.
Ingredients:
Chicken:
From your butcher (if you can and have the time), get a free-range chicken and ask them to cut it into 8 pieces or pick up the pieces you like best at the counter. (Getting it from the butcher is “greener” because you avoid the Styrofoam and plastic packaging.) One chicken will serve five to six people.

Kelly's Chicken-- Yumm!
Quart of buttermilk
Seasoned flour:
2 Cups flour mixed well with two teaspoons of salt, one tablespoon of paprika, and two teaspoons of ground black pepper (add more or less to your taste).
Seasoned breadcrumbs
Use your favorite store bought or make your own. I follow the Joy of Cooking recipe: place dry slices of bread directly on middle rack in a 200° oven for 30 minutes or so until dry but not browning. Let the bread cool on the rack. Using a food processor, break up dried slices of bread and pulse until bread crumbs form. (I used one slice of bread per chicken piece). Add seasonings to the crumbs in the food processor: about one teaspoon each of salt and pepper and two teaspoons of dried oregano.
Egg wash: Lightly scramble six eggs with two tablespoons water (for 8 pieces).
Olive oil (for baking pan)
Olive oil spray
Salt (Kosher or sea salt)
The key to really good baked-fried chicken is making an assembly line. (Pie plates work well for this because they have a flat bottom and deep enough sides to hold the flour and breading mixtures.) Preheat oven to 425° and set up five stations: Large bowl with chicken pieces and buttermilk (let soak in the refrigerator overnight ahead of time if you like); then next to the bowl place a baking dish/pie dish with flour mixture; next to that place a baking dish with egg wash; then place a baking dish with bread crumbs; finally, at the end place a roasting pan or large casserole dish with olive oil drizzled liberally on the bottom. For each chicken piece soaked in buttermilk, place in flour and turn to coat both sides, then place in egg wash and turn to coat both sides, then dip in bread crumbs and coat both sides. Place breaded chicken onto a large oiled roasting or baking pan. Sprinkle each piece with Kosher or sea salt, then spray the tops of each piece with olive oil spray. Bake for 25 minutes at 425° then lower temperature to 375° for 20 to 25 more minutes. (Chicken juice should run clear when pierced with a knife when done.)

The cake was a hit-- Zach had thirds, but who's counting.
Retro Raspberry Sponge Cake
This is a charming, old-fashioned cake with homemade raspberry icing that drips down the sides. I am craving it again as I right down the recipe. We had organic raspberries on hand from Tolay Valley Farms through our weekly CSA, which inspired the idea for this cake. The best part is the homemade raspberry icing, so if you wish, use a boxed cake mix and make the frosting instead. If you want a truly retro, old-fashioned cake, then use the recipe below and enjoy! This cake is perfect for making a day ahead, which is what I did for our A’s game tailgate picnic.

Amazing Retro Raspberry Cake
Sponge cake: I looked through several cookbooks and decided on the following recipe from Joy of Cooking (1980) and the cake turned out just beautifully.
Ingredients: 1 lemon, granulated sugar, all purpose or cake flour (I used all purpose and it worked well), 6 eggs at room temperature (this is really important to do – let them sit out for an hour), boiling water, double-acting baking powder, salt, vanilla.
Preheat oven to 350°
Grate 1 teaspoon of lemon zest and in a small bowl stir lemon zest into 1 cup of sugar.
Separate the six eggs by placing yolks into large mixing bowl, and whites into electric mixing bowl or other large bowl to use later with a hand-held electric mixer.
In the large mixing bowl with the yolks, beat the yolks until very light with a hand held whisk. Gradually beat in the sugar/lemon zest mixture. Beat in ¼ cup of boiling water and let cool a minute then mix in 1 teaspoon of vanilla.
Sift before measuring 1 cup of cake flour (or all purpose) then into a medium bowl resift the flour with 1 ½ teaspoons double-acting baking powder and ¼ teaspoon of salt. Gradually add this flour mixture to the yolk mixture with a spatula until blended.
Whip the egg whites in electric mixing bowl or with an electric hand-held mixer until they are stiff but not dry (when you lift the mixing blades up and a peak forms and stays it’s ready.) Fold the egg whites with the spatula using swift strokes moving from the center of the batter, down and up along the side of the bowl until the cake batter is just lightly blended but don’t over mix it. Pour cake batter into 9-inch tube pan that is NOT greased. (It works best to use a tube pan with a bottom that detaches.) Bake 40 to 45 minutes. Cool upside down – if your pan doesn’t have resting points on the rim that let it stand above the surface to cool, then place it on an inverted funnel or drink bottle (not plastic because that will melt.)
Raspberry icing: I created this recipe by combining two recipes – one for raspberry sauce and one for fruit icing.
Raspberry sauce (The Martha Stewart Living Cookbook)
Ingredients: 1 pint raspberries (2 cups), ¼ cup granulated sugar, 2 tablespoons fresh lemon juice, pinch of salt.
Combine all ingredients into small nonreactive saucepan and heat on low for about 7 minutes until berries release their juices and start to break down. Using a rubber spatula, press the berry mixture through a fine sieve (discard the yucky solids). Let sauce cool and keep in refrigerator until ready to use. Makes about ¾ cup.
Raspberry icing: Mix ½ cup raspberry sauce (see above) with 2 cups sifted confectioners’ sugar, then beat in 3 tablespoons soft butter and ½ tablespoon lemon juice. Add enough sugar to thicken, but keep it runny enough to drizzle over cake.
To ice the cake, use a hand whisk to dip into the icing and drizzle liberally over the cake, letting it drip down the sides, layering the drizzles until they form a thick icing on top.
 They did it through their birthday gifts. Zoë gave me some beautiful Japanese bowls. Zach was a little more direct; he gave me a book on how to make sushi. Neither one knew of the others gift, giving us all a laugh. My Mom followed up with tempura recipes in a cookbook she gifted to Kelly for Christmas. We found a nice rice cooker (a very important part of sushi making) at the local kitchen discount store and found a tempura cooker for $10 at another local discount store. Next step: send out invitations, roll up your sleeves and be fearless.


 On the way to our second stop in Pasadena, we managed to fit in some disc golf at the historic
  however the desert floor did not. Our next trek was by foot on a 9-mile hike to and from
  making fantastic music as he records and tours as
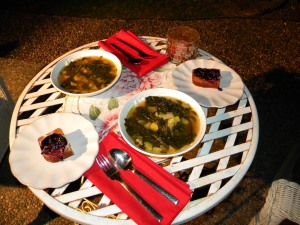
  kitchen the following night for a meal we prepared with risotto and mussels. We spent our last day making a video for

 sparked by the food were truly a highlight of the evening. Kelly captured Zoë on video sharing the role food plays in her family.
 Yogurt Sauce
 Try ours or make your own. We’d love to hear about your creations and the stories around your dinner table.